Welcome to The Cookie Monster, a blog about the most marvelous, versatile, and beloved bakeable item in the land: The cookie. You may see occassional forays into pies, bars, and other sweet treats, but my main focus is and has always been on the bite sized genius behind my very favorite snack. Happy Baking!

Thursday, November 21, 2013

Cake Wars, Sister Edition


This little guy just turned 1!!!!!

I know, I know....crazy stuff.  And although I did not make any cookies for this young man's birthday, I did decorate a cake. Sadly, my sister also decorated a cake, and hers was way more impressive. You be the judge:

Mommy's cake

Auntie's cake. 

I mean, she drew a deer y'all.  Pshhhhh. Anyway, the adults enjoyed the gorgeous Auntie Jame creation, while my 1 year old smashed and devoured his momy's cake. All parties were satisfied.


Good times, had by all. Especially this little guy:


More cookies to come. Happy Baking!

Saturday, November 9, 2013

Microwave, single serve, chocolate chip cookie


Hi friends! It has been a million years, it seems, since I posted a recipe.  Since last we blogged (or I blogged) I've made fancy tea party cookies, peanut butter M&M cookies, white chocolate cranberry cookies, banana bread, and probably more.  Parenting and blogging, for me anyway, just do not mix well.

BUT!

Tonight I share with you a glorious discovery: the cookie for the stay-at-homers, the pressed-for-time moms, the single ladies....and in my case the wives who are subject to hunting season. I give you, a single serving cookie that takes less than 5 minutes to make.  You're welcome and I'm sorry.

Ingredients:
1 tablespoon butter
1 tablespoon sugar
1 tablespoon brown sugar
Pinch salt
Splash vanilla
1/2 an egg yolk
3 tablespoons flour
Chocolate chips at your disposal

In a mug, or ramekin, Melt the butter, about 20 seconds in the microwave.  Add the sugars, salt and vanilla, mix. Add in the egg yolk, mix. Finally add in the flour and chocolate chips and mix until combined.

Microwave for 30 seconds. If the cookie still looks wet on top, zap it for 10 more.

Let it cool for a minute, then Eat it with a spoon. With ice cream. And maybe a beer or a glass of wine. Happy Saturday night for this mommy :)


I am hoping to recap some of my missed-baking endeavors soon, and perhaps even launch a lifestyle-type blog, in an effort to keep my posts more regularly.  In any case, make one of these bad boys between now, and then. :)

Happy weekend! 


Saturday, August 24, 2013

Nutella Sandwich Cookies


Happy Weekend Friends!  I managed to bake again this month.  Hooray!  And there are a few fun projects coming up in the near future, but for today I'm sharing my recipe for Nutella Sandwich cookies, and man oh man, are these tasty.


Ingredients:
1/2 cup shortening
1/3 cup sugar
1/3 cup brown sugar
1 tsp baking soda
1 tsp vanilla
1 egg
dash salt
1 1/2 cups of flour
3/4 cups quick cooking oats
Nutella

Start off by mixing the shortening and the sugars until combined.  Add in the egg, vanilla, salt and baking soda.  Mix well.


Mix in the dry ingredients until just combined.  Roll the dough into half inch balls, and space them 2 inches apart on a parchment lined baking sheet.


Press the balls flat with the bottom of a glass or a spatula....


Bake at 375F for 8 minutes. let cool on a wire rack before sandwiching.


And enjoy!  My husband insists that the best way to eat these cookies is warm, with some coffee ice cream on the side.


I hope you're all enjoying you're last few weeks of summer!

Friday, August 16, 2013

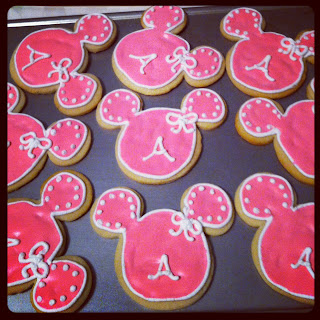
Minnie Mouse Birthday Cookies!

Hey Blog folk!

Although I have certainly dropped off on the blog posting, I am still baking and doing special event cookies for Friends and Family!  I thought I would share the Sugar cookies I made for my cousin Aubrie's first birthday party.  Minnie Mouse was the pretty pink theme :)

Ingredients:
1/3 cup butter
1/3 cup shortening
3/4 cups sugar
1 tsp Vanilla
1 egg
1/2 teaspoon baking soda
dash salt
2 cups flour


Mix together the butter and shortening, adding in the sugar until well blended and fluffy.  Add in your egg and vanilla, scraping down the sides of the bowl.  Finally sift in your dry ingredients, and mix until well combined.

Refrigerate your dough for 30 minutes or so to make it more manageable for rolling.  When using cookie cutters, sometimes it helps to put the unbaked cookies in the fridge for 15 minutes or so before baking.  This will help the cookies keep their intended shape, and not spread as much on the sheet during baking. Bake for 7-8 minutes at 375F.

I used my go to Royal Icing recipe that I often use for these kinds of cookies.  It dries rock hard and leaves a shiny pretty finish.


Allow these cookies to dry for at least 4 hours, preferably overnight, before stacking or packaging them.

Some ribbon and packaging and we're ready for the Party!


Happy Birthday Aubrie!!!

Stay tuned for some fun shower cookies coming up within the next month, and if time allows, I might even bake something just for fun :)

Wednesday, July 10, 2013

Blue and Orange Anchor Cookies


Hi Blog Folk!  Last week one of my dear friends from High School celebrated her Bridal Shower, and I was thrilled to do some custom cookies for the event.  The lovely bridal party hosted the day at the Winthrop Yaught Club, so the Nautical theme was present throughout.

I went with a basic Sugar Cookie recipe that I've used often, and sketched out the design after several google searches for "Anchor cookies."  Conveniently, the Bride and Groom both have a last name beginning with "R" so I decided on a cursive initial to really customize the whole look.


The whole process took a bit longer than usual, because of my favorite little distraction:


But slowly and surely, the cookies started to come together.


A little wrapping and ribbon and we are shower ready!


Not bad eh?


I just agreed to do some more custom cookies this month for a very adorable little girl's first birthday!  I'll be sure to share them with you :)

Happy Baking!

Thursday, May 30, 2013

Peanut Butter Two Bite Brownies


Hey Party People!  It's been a busy few weeks and it's coming down to the wire, but my new goal is to post at least twice a month, so here is Post #2 for May!  And it's a yummy addition.

Ingredients:


1/2 cup butter
1 cup sugar
1 tsp vanilla
2 eggs
1/3 cup unsweetened cocoa powder
1/2 cup flour
1/4 tsp baking powder
1/4 tsp salt
1 cup Peanut Butter chips


First up, melt your butter and whisk in together with the sugar.  Add in the egg and vanilla, and whisk some more, until it's nice and smooth.


Add in all of the dry ingredients (except for the PB chips) and mix until smooth....


Spoon the batter into a mini muffin pan.  I had a little bit of trouble getting the brownie bites out, so make sure you grease and flour the pan.


Sprinkle the PB chips on top.  Definitely eat a few for good measure.


Bake at 375F for about 11 Minutes.


"Nummies" as I would say to Hunter, while urging him to eat his pureed carrots.  These, I promise, are actually nummy. 

Happy Baking!

Friday, May 3, 2013

Brown Sugar Chocolate Chunk Cookies


Here's a new one for you folks!  Joe is headed out Turkey Hunting this weekend with the boys, so I thought I'd whip up some cookies in the hopes that it would be a fair trade for a Turkey Dinner Sunday night! (Fat chance, "Turkey hunting" secretly means "boozing in the Hunting Cabin").

Ingredients:
1 cup butter, softened
1 cup Brown Sugar
1 egg
1 tsp vanilla
1 tsp baking soda
1/2 tsp baking soda
dash salt
2 cups flour
1 bag chocolate chunks

Mix together your butter and sugar until well blended, adding in your vanilla and egg next.


Next, add in your dry ingredients, remembering to scrape down the sides of the bowl when you need to.  Also, check for approval from the peanut gallery.


Finally, add in your chocolate chunks.


Roll into tablespoon sized balls, and transfer to a parchment lined baking sheet.  Bake at 375 for 10 minutes.


Cool on a wire rack, then pound like 5 of these bad boys with a glass of milk.


Happy Baking!

Friday, April 12, 2013

Easter Baking (So late, I know!)


Hey blog peeps!

I wanted to share with you some photos of my Easter baking endeavors.  I managed to make some delightful little sugar cookies....


And some Easter themed cupcakes, using a few of the army of peeps my mom brought over to my house.


Yum!  It was a busy day, complete with some extra fussiness from this little fella....


Don't let the cuteness fool you.... But he does know a thing or two about good cookies...


Happy Baking!

Sunday, March 17, 2013

Dark Chocolate Coconut Brownies


Happy St. Patrick's Day bloggers!  Though I don't have any green cookies to share with you today I do have a yummy brownie recipe that takes the timeless classic to a new level.  Enter: Dark Chocolate Coconut Brownies.  Yummers.

Ingredients:

1/2 cup butter, melted
1 cup sugar
1 tsp vanilla
2 eggs
1 tsp baking powder
1/4 cup dark cocoa  powder
1/2 cup flour
dash salt
Shredded coconut


Mix together your butter and sugar, adding in your eggs after the butter is cool (we don't want scrambled eggs in our brownies, after all).  Then in with the vanilla, salt and baking soda.


In with the cocoa and the flour, mix until smooth.  And be sure to eat some.


Pour into an 8x8 greased brownie pan and top with the coconut.  Bake at 350F for 20 minutes, in my oven it took about 22.  Allow brownies to cool before cutting, unless you just want to eat them with a spoon, which is totally OK, I won't judge.


And enjoy!


I'll spare you the sob story about why I've been MIA as of late.  new job, cranky baby, my kitchen being taken over by this:

I'll do better!  Happy Baking!